Step 1: As Windows does not come prepackaged with this capability, you’ll need to download a third-party application. The best way to achieve the effect of allowing us to store files, programs and windows to an additional location of the desktop is by using an OS X style ‘dock’ program. RocketDock is simple, effective and free, so that’s what we’ll be using. You can download RocketDock here.
Step 2: RocketDock should take no more than a few minutes to download. Once it’s finished, install the program with the default settings, unless you want to change the location of the program files or add a desktop icon. When we installed it, RocketDock was malware, adware and browser-toolbar free, but always check to make sure you’re not installing something you don’t want as well as the product.
Step 3: Open the application. By default, it should open at the top with icons already set up to take you to your control panel, network, documents, music, pictures and My Computer folders.
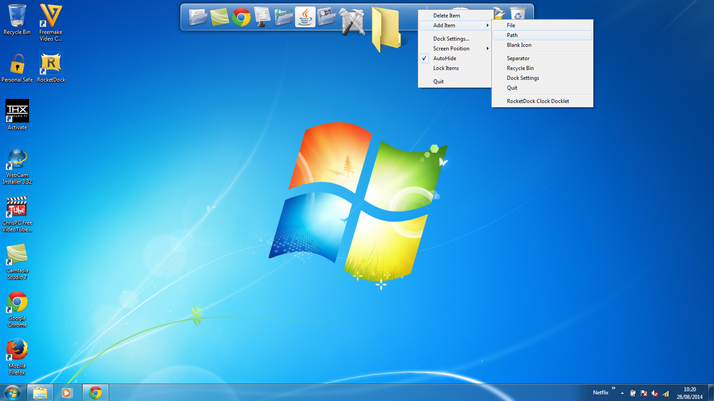
It will also include a few icons linking you back to the creators, but these can be deleted by right-clicking them and selecting ‘Delete Icon’. Step 4: Customisation is simple: you can drag and drop the icons on the task bar to rearrange them, or drag them outside of the task bar to remove them altogether. To add new icons, right-click the taskbar and select ‘Add Item’. This will open a sub-menu where you can select a specific item to add to the taskbar; to add a specific folder, select ‘path’, navigate to the desired folder from the pop-up menu, and click ok.
An icon for your chosen folder will appear in the taskbar, which you can then customise by right-clicking and selecting ‘Icon Settings’, with options such as changing the visual representation to fit the taskbar’s theme. Alternatively, you can also just drag and drop a file or folder directly into your taskbar from the desktop or your folders. Step 5: To change the position of the taskbar, right-click it and select ‘screen position’. You can then choose to place it at the top, bottom, left or right of your monitor. If you wish to fine-tune the position further, you can go into your ‘dock settings’, either through right-clicking or through the default icon on the taskbar, and adjust how far it is to the either side of the screen. You can also change the position of your default windows taskbar by right-clicking anywhere on the taskbar and unchecking the ‘lock the taskbar’ option, enabling you to move the taskbar to any edge of the screen.
You can also specify whether the taskbar appears by default on top of, or underneath, your other windows, and whether it auto-hides when not moused over. There are numerous options in the dock settings for changing the size, colour and theme of the taskbar, which can be tweaked at will, and the bahaviours of the icons can be similarly modified for maximum ease and efficiency. Once you have RocketDock set up to your satisfaction, you’re good to go with a second taskbar. Read Next: